BurningBright

  • Home

  • Tags

  • Categories

  • Archives

  • Search

Install mysql linux 5.7.22

Posted on 2018-06-12 | Edited on 2018-12-16 | In db

Decompress package

1
2
3
4
cd /usr/local
tar -xzvf mysql-5.7.22-linux-glibc2.12-x86_64.tar.gz
rm -f mysql-5.7.22-linux-glibc2.12-x86_64.tar.gz
mv mysql-5.7.22-linux-glibc2.12-x86_64.tar.gz mysql

Group & User

1
2
3
4
5
6
7
8
9
10
11
12
# linux account
groupadd mysql
useradd -r -g mysql mysql

# dataspace
cd /usr/local/mysql
mkdir data

# privilege
cd /usr/local
chown -R mysql mysql/
chgrp -R mysql mysql/

Init

1
2
3
4
5
6
7
8
cd /usr/local/mysql/bin

./mysqld --initialize
--user=mysql
--basedir=/usr/local/mysql/
--datadir=/usr/local/mysql/data/
--lc_messages_dir=/usr/local/mysql/share
--lc_messages=en_US

remember the init root password

Setting

1
2
3
4
5
6
7
8
9
10
11
12
vi /etc/my.cnf
# modify

basedir=/usr/local/mysql/
datadir=/usr/local/mysql/data
port=3306
character-set-server=utf8
explicit_defaults_for_timestamp=true

#datadir=/var/lib/mysql
#socket=/usr/local/mysql/data/mysql.sock
user=mysql

Service

1
2
3
4
5
6
7
8
9
10
cd /usr/local/mysql/support-files/
cp mysql.server /etc/init.d/mysql
vi /etc/init.d/mysql

# add setting
basedir=/usr/local/mysql/
datadir=/usr/local/mysql/data/

chmod +x /etc/init.d/mysql
chkconfig --add mysql

privilege

1
2
3
4
5
cd /usr/local/mysql/bin
./mysql -u root -p
set password=password("root");
grant all privileges on *.* to'root' @'%' identified by 'root';
flush privileges;

Exception

1
mysqld: Can't create/write to file '/tmp/ibgXpx9Y' (Errcode: 13 - Permission denied)

if the /tmp dirctory have no permission:

1
chmod 777 /tmp

https://blog.csdn.net/NB6063/article/details/80417319
https://blog.csdn.net/shaochenshuo/article/details/51375905
Intelij maven 3.x & nexus 2.x

Posted on 2018-06-11 | Edited on 2019-06-07 | In java

install nexus 2.x first , need java 1.7+

https://www.sonatype.com/download-oss-sonatype

config nexus

Add a user user pass pass, grant privilege
For example a project named InitialD
Add a repository InitialD-release
Add a repository InitialD-snapshot

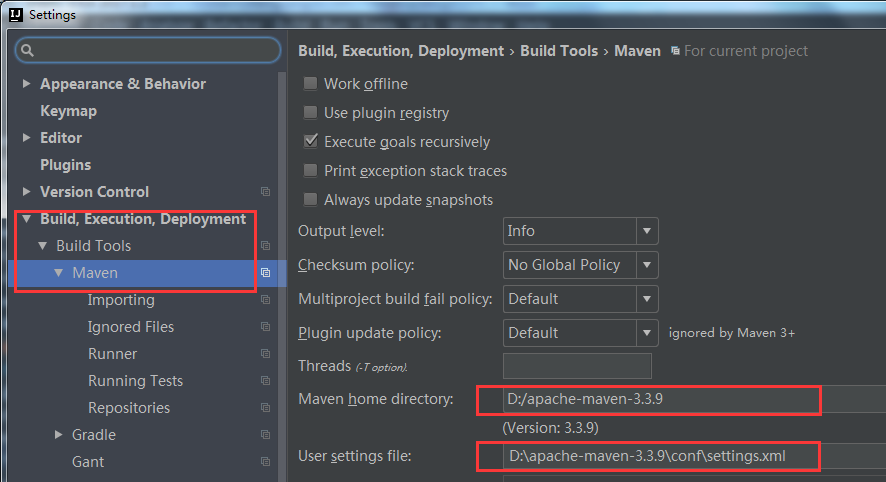
install maven 3.x

Add environment variable MAVEN_HOME to the maven dirctory.
Modify environment variable path add ;%M2_HOME%\bin
http://maven.apache.org/download.cgi

config maven

Modify %MAVEN_HOME%/conf/settings.xml add servers-server / profile-repositories-repository

server:

1
2
3
4
5
6
7
8
9
10
<server>
<id>InitialD-release</id>
<username>user</username>
<password>pass</password>
</server>
<server>
<id>InitialD-snapshot</id>
<username>user</username>
<password>pass</password>
</server>

repositorie:

1
2
3
4
5
6
7
8
<repository>
<id>InitialD-release</id>
<url>http://127.0.0.1:8081/nexus/content/repositories/InitialD-release</url>
</repository>
<repository>
<id>InitialD-snapshot</id>
<url>http://127.0.0.1:8081:8081/nexus/content/repositories/InitialD-snapshot</url>
</repository>

Intelij config

change maven to self define package/ configure:

modify pom.xml in intelij project:

1
2
3
4
5
6
7
8
9
10
11
12
13
<distributionManagement>
<repository>
<id>dms-release</id>
<name>Team Nexus Release Repository</name>
<url>http://127.0.0.1:8081/nexus/content/repositories/InitialD-release</url>
</repository>
<snapshotRepository>
<id>dms-snapshots</id>
<name>Team Nexus Snapshot Repository</name>
<url>http://127.0.0.1:8081/nexus/content/repositories/InitialD-snapshot</url>
<uniqueVersion>false</uniqueVersion>
</snapshotRepository>
</distributionManagement>

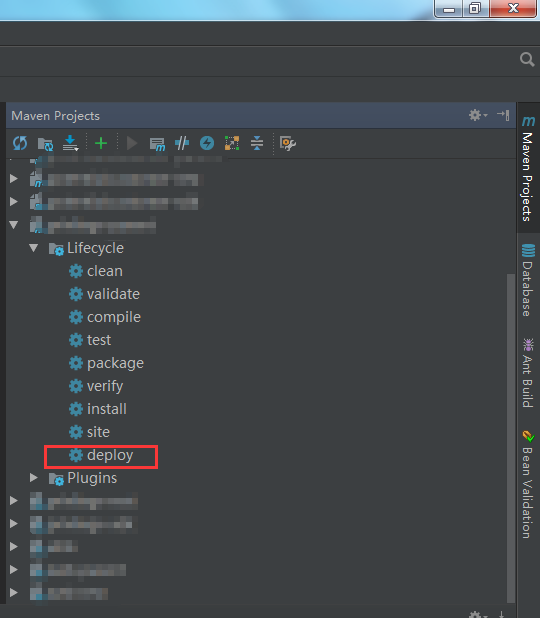
use maven plugin deploy package:

https://www.cnblogs.com/lyy-2016/p/5747631.html
https://blog.csdn.net/win7system/article/details/51252275
https://www.cnblogs.com/mfrbuaa/p/5408185.html

WebSocket protocol

Posted on 2018-05-31 | Edited on 2018-12-16 | In javascript

Origin

WebSocket is design for intercommuncation[full duplex].
The http protocol is build in TCP[Transfer level], only one side can send or recevie.
When job is done, request will close the TCP connection.

If we want a long time alive connection.

  1. Http’s keep-alive head property is not design for long connection.
    It’s design for increase effciency, in avoid 3 times handclasp.
    When out of time, server will still close it.
  2. Http loop request. it’s very common strategy, but very low effciency.
  3. Make a TCP like connection, and keep it not be break.

WebSocket is just like TCP UDP work in Transfer level, a socket in origin.

Connection

Create a server service

1
2
3
4
5
6
7
8
9
10
11
12
13
14
let http = require("http");
const hostname = "127.0.0.1";
const port = "9090";

// create a service
let server = http.createServer((req, res) => {
console.log("recv request");
console.log(req.headers);
});

// create a listener
server.listen(port, hostname, () => {
console.log(`Server running at ${hostname}:${port}`);
});

Ceate a broser client

1
2
3
4
5
6
7
8
9
10
11
12
13
14
15
16
17
<!DOCType html>
<html>
<head>
<meta charset="utf-8">
</head>
<body>
<script>
!function() {
const socket = new WebSocket('ws://127.0.0.1:9090');
socket.onopen = function (event) {
console.log('opened');
socket.send('hello, this is from client tiger');
};
}();
</script>
</body>
</html>


Service

Nodejs do not execute the recall function. Because another upgrade event.

1
2
3
server.on("upgrade", (request, socket, head) => {
console.log(request.headers);
}
  • If make no response then connection closed before recevie headshake:

In request header, sec-websocket-key is used to verify server is legal.

1
2
3
4
5
socket.write('HTTP/1.1 101 Web Socket Protocol Handshake\r\n' +
'Upgrade: WebSocket\r\n' +
'Connection: Upgrade\r\n' +
`Sec-WebSocket-Accept: \r\n` +
'\r\n');

  • If the server response sec-websocket-key is not right, then data is dirty:

Calculate

Sec-WebSocket-Accept = base64(sha1(Sec-Websocket-key + GUID))

1
2
3
# command
npm init
npm install sha1 --save
1
2
3
4
5
6
7
8
9
10
11
12
13
14
let sha1 = require('sha1');
server.on("upgrade", (request, socket, head) => {
let secKey = request.headers['sec-websocket-key'];
// RFC 6455 (GUID)
const UNIQUE_IDENTIFIER = '258EAFA5-E914-47DA-95CA-C5AB0DC85B11';
// calc sha1 base64
let shaValue = sha1(secKey + UNIQUE_IDENTIFIER),
base64Value = Buffer.from(shaValue, 'hex').toString('base64');
socket.write('HTTP/1.1 101 Web Socket Protocol Handshake\r\n' +
'Upgrade: WebSocket\r\n' +
'Connection: Upgrade\r\n' +
`Sec-WebSocket-Accept: ${base64Value}\r\n` +
'\r\n');
});

ps. Look at the eyes and meet the right person :)

Recevie

Frame in documents is like this :

1
2
3
4
5
6
7
8
9
10
11
12
13
14
15
16
17
18
0               1               2               3              
0 1 2 3 4 5 6 7 0 1 2 3 4 5 6 7 0 1 2 3 4 5 6 7 0 1 2 3 4 5 6 7
+-+-+-+-+-------+-+-------------+-------------------------------+
|F|R|R|R| opcode|M| Payload len | Extended payload length |
|I|S|S|S| (4) |A| (7) | (16/64) |
|N|V|V|V| |S| | (if payload len==126/127) |
| |1|2|3| |K| | |
+-+-+-+-+-------+-+-------------+ - - - - - - - - - - - - - - - +
| Extended payload length continued, if payload len == 127 |
+ - - - - - - - - - - - - - - - +-------------------------------+
| |Masking-key, if MASK set to 1 |
+-------------------------------+-------------------------------+
| Masking-key (continued) | Payload Data |
+-------------------------------- - - - - - - - - - - - - - - - +
: Payload Data continued ... :
+ - - - - - - - - - - - - - - - - - - - - - - - - - - - - - - - +
| Payload Data continued ... |
+---------------------------------------------------------------+

  1. first level is the frame’s head
    • FIN finish if the bit is 1
    • RSV1 RSV2 RSV3 reserve bit some application use it to show wheather data is compressed.
    • opcode operation code 0001 is text
    • MASK mask the data space if the bit is 1
    • Payload len data’s byte length
    • Extended ... if the length cross 2^7[127], use other 8 bytes to store length.
  2. second level is masking-key space 4 bytes
  3. third lecel is data space ? bytes
1
2
3
4
5
6
7
8
9
10
11
12
13
14
|Opcode  | Meaning                             | Reference |
-+--------+-------------------------------------+-----------|
| 0 | Continuation Frame | RFC 6455 |
-+--------+-------------------------------------+-----------|
| 1 | Text Frame | RFC 6455 |
-+--------+-------------------------------------+-----------|
| 2 | Binary Frame | RFC 6455 |
-+--------+-------------------------------------+-----------|
| 8 | Connection Close Frame | RFC 6455 |
-+--------+-------------------------------------+-----------|
| 9 | Ping Frame | RFC 6455 |
-+--------+-------------------------------------+-----------|
| 10 | Pong Frame | RFC 6455 |
-+--------+-------------------------------------+-----------|

In browser if refresh the window, websocket will send the close frame:

1
2
3
4
5
6
7
buffer len =  8
<Buffer 88 82 34 b3 e3 25 37 5a>
maskFlag = 1
pLength = 2
maskKey = 52,179,227,37[34 B3 E3 25]
payloadHex = 03 E9
payloadText = Ȃ

Analysis

1
2
3
4
5
6
7
8
9
10
11
12
13
14
15
16
17
18
19
20
21
22
23
24
socket.on('data', buffer => {
console.log('buffer len = ', buffer.length);
console.log(buffer);

// ------------------------

let bitBuffer = new BitBuffer(buffer);
let maskFlag = bitBuffer._getBit(8);
console.log('maskFlag = ' + maskFlag);

let payloadLen = bitBuffer.getBit(9, 7),
maskKeys = bitBuffer.getMaskingKey(16);

console.log('pLength = ' + payloadLen);
console.log('maskKey = ' + maskKeys +
'[' + bitBuffer.bytesToHexString(maskKeys[0]) + ' ' +
bitBuffer.bytesToHexString(maskKeys[1]) + ' ' +
bitBuffer.bytesToHexString(maskKeys[2]) + ' ' +
bitBuffer.bytesToHexString(maskKeys[3]) + ']');

let payloadText = bitBuffer.getXorString(48 / 8, payloadLen, maskKeys);
console.log('payloadText = ' + payloadText);

});
1
2
3
4
5
6
7
8
9
10
11
12
13
14
15
16
17
18
19
20
21
22
23
24
25
26
27
28
29
30
31
32
33
34
35
36
37
38
39
40
41
42
43
44
45
46
47
48
49
50
51
52
53
54
55
56
57
58
class BitBuffer {

constructor (buffer) {
this.buffer = buffer;
this.hexChar = ['0', '1', '2', '3', '4', '5',
'6', '7', '8', '9', 'A', 'B', 'C', 'D', 'E', 'F'];
}
// fetch xth bit content
_getBit (offset) {
let byteIndex = offset / 8 >> 0, // target utf-8 character
byteOffset = offset % 8; // target bit offset in character
// readUInt8 read the nth character data
let num = this.buffer.readUInt8(byteIndex) & (1 << (7 - byteOffset));
return num >> (7 - byteOffset);
}

// [from, length]
getBit (offset, len = 1) {
let result = 0;
for (let i = 0; i < len; i++)
result += this._getBit(offset + i) << (len - i - 1);
return result;
}

// masking-key
getMaskingKey (offset) {
const BYTE_COUNT = 4;
let masks = [];
for (let i = 0; i < BYTE_COUNT; i++)
masks.push(this.getBit(offset + i * 8, 8));
return masks;
}

// get plaintext
getXorString (byteOffset, byteCount, maskingKeys) {
let text = '';
let hex = '';
for (let i = 0; i < byteCount; i++) {
let j = i % 4;
// get origin utf-8 encoded data though exclusive or
let transformedByte = this.buffer.readUInt8(byteOffset + i)
^ maskingKeys[j];
// put utf-8 bytes to ascii char
text += String.fromCharCode(transformedByte);
hex += this.bytesToHexString(transformedByte) + ' ';
}
console.log('payloadHex = ' + hex);
return text;
}

// char to 2-hex String
bytesToHexString(num) {
let text = '';
text += this.hexChar[num >>> 4 & 0xf];
text += this.hexChar[num & 0xf];
return text;
}
}

socket.send(‘hello, this is from client tiger’);

1
2
3
4
5
6
7
8
9
buffer len =  38
<Buffer 81 a0 f1 3d 90 39 99 58 fc 55 9e 11 b0 4d 99 54 e3 19 9
8 4e b0 5f 83 52 fd 19 92 51 f9 5c 9f 49 b0 4d 98 5a f5 4b>
maskFlag = 1
pLength = 32
maskKey = 241,61,144,57[F1 3D 90 39]
payloadHex = 68 65 6C 6C 6F 2C 20 74 68 69 73 20 69 73 20 66 7
2 6F 6D 20 63 6C 69 65 6E 74 20 74 69 67 65 72
payloadText = hello, this is from client tiger

Toke last 4 bytes for example:
origin data is 98 5a f5 4b, masking key is F1 3D 90 39

1
2
3
4
5
98 5a f5 4b XOR F1 3D 90 39 = 69 67 65 72
69 = 'i'
67 = 'g'
65 = 'e'
72 = 'r'

Last issue

In application websocket implements ping/pong[9/10] is used to make sure connection alive.
Client ping server every 30s, server response pong message frame.
If server not recevie client’s ping frame in 1 minute, it will close the connnection.

Broser websocket modual not implemented this mechanism.
If long connection is needed, you need loop ping frame by yourself.

https://www.w3.org/TR/websockets/
https://www.w3.org/TR/2011/WD-websockets-20110419/
https://tools.ietf.org/html/rfc6455

http://www.open-open.com/lib/view/open1527469228211.html
https://www.yinchengli.com/2018/05/27/chrome-websocket/
https://blog.jcoglan.com/2015/03/30/websocket-extensions-as-plugins/

https://docs.spring.io/spring-framework/docs/5.0.0.BUILD-SNAPSHOT/spring-framework-reference/html/websocket.html

Mondrian architecture

Posted on 2018-05-24 | Edited on 2018-12-16 | In db

Mondrian系统的图层

OLAP: OnlineAnalytical Processing
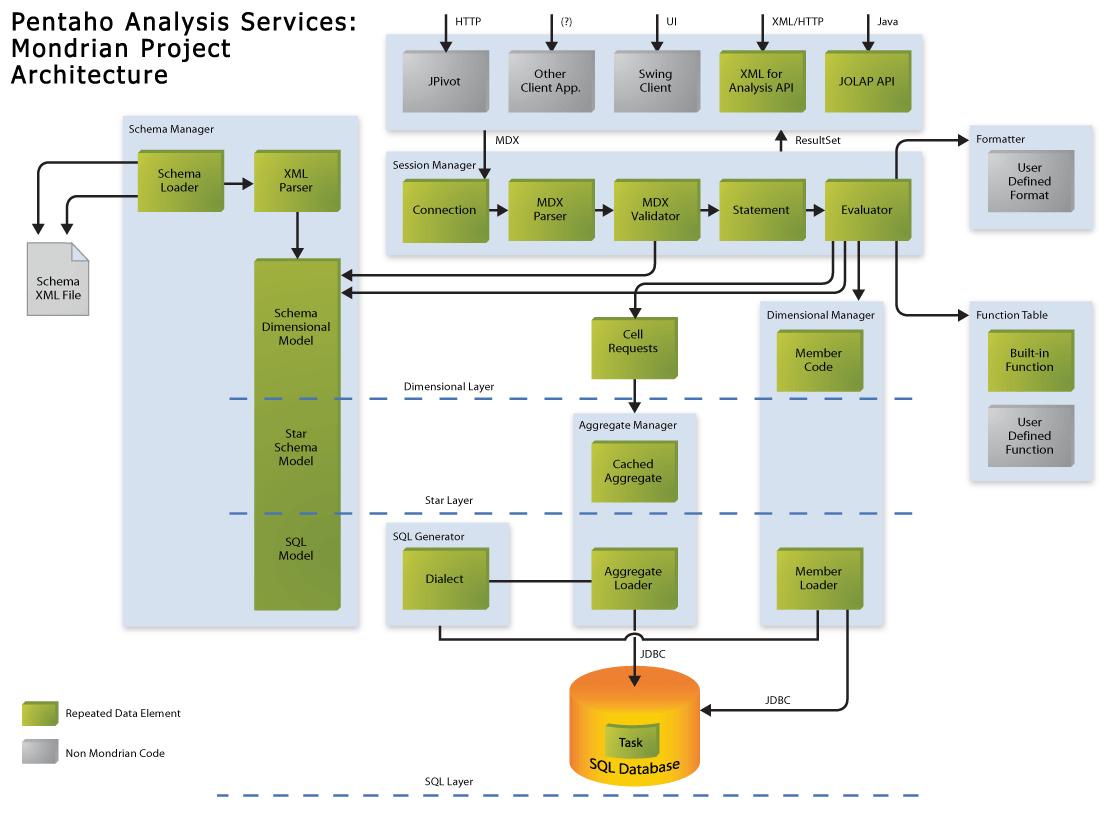
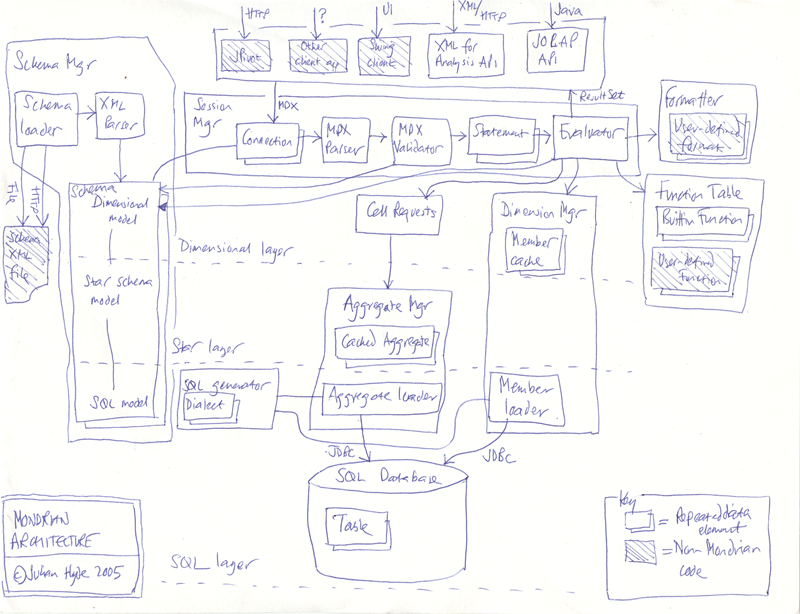
Mondrian OLAP系统由四层组成; 从最终用户的眼睛到数据中心的核心,有如下:表示层,维度层,星层和存储层。

表示层决定最终用户在他或她的监视器上看到的内容,以及他或她如何交互以提出新问题。有多种方式可以呈现多维数据集,
包括数据透视表(上面显示的表格的交互式版本),饼图,线条和条形图以及高级可视化工具,如可点击的地图和动态图形。
这些可以用Swing或JSP编写,以JPEG或GIF格式呈现的图表或通过XML传输到远程应用程序。所有这些表示形式的共同之处在于
表示层提出问题的维度,度量和单元的多维“语法”,并且OLAP服务器返回答案。

第二层是维度层。维度层解析,验证并执行MDX查询。查询分多个阶段进行评估。首先计算坐标轴,然后计算坐标轴内单元格的值。
为了提高效率,维度层将批量请求发送给汇聚层。查询转换器允许应用程序操纵现有查询,而不是从头开始为每个请求构建MDX语句。
元数据描述了维度模型,以及它如何映射到关系模型。

第三层是星级层,负责维护聚合缓存。聚合是内存中的一组度量值’单元’[cells],由一组维度列值限定。维度层发送单元组请求。
如果请求的单元格不在高速缓存中,或者通过在高速缓存中汇总聚合进行派生,则聚合管理器会向存储层发送请求。

存储层是一个RDBMS。它负责提供聚合的单元格数据,以及维度表中的成员。
我在下面描述为什么我决定使用RDBMS的功能,而不是开发针对多维数据优化的存储系统。

这些组件可以全部存在于同一台机器上,也可以分布在机器之间。构成Mondrian服务器的第2层和第3层必须位于同一台计算机上。
存储层可以在另一台机器上,通过远程JDBC连接访问。在多用户系统中,表示层将存在于每个最终用户的机器上(除了在服务器上生成的JSP页面的情况)。


存储和聚合策略

OLAP服务器通常根据其存储数据的方式进行分类:

  • MOLAP(multidimensional OLAP)服务器将其所有数据存储在磁盘中,并针对多维访问进行优化。
    通常,数据以密集阵列存储,每个单元值只需要4或8个字节。
  • ROLAP(relational OLAP)服务器将其数据存储在关系数据库中。事实表中的每一行都有一个用于每个维度和度量的列。
    需要存储三种数据:事实表数据(事务记录),聚合和维度。

MOLAP数据库以多维格式存储事实数据,但如果维度不止一个维度,则这些数据将会很稀疏,并且多维格式表现不佳。
HOLAP(混合OLAP)系统通过在关系数据库中保留最细粒度的数据来解决此问题,但将聚合以多维格式存储。

预先计算的聚合对于大型数据集是必需的,否则某些查询在未读取事实表的全部内容的情况下不能被回答。
MOLAP聚合通常是内存数据结构的图像,分解成页面并存储在磁盘上。ROLAP聚合被存储在表中。
在一些ROLAP系统中,这些由OLAP服务器显式管理; 在其他系统中,这些表被声明为物化视图[materialized views],
并且当OLAP服务器使用 group by子句中列的正确组合发出查询时,它们将被隐式使用。

聚合策略的最后组件是缓存。高速缓存将预先计算的聚合保存在内存中,以便后续查询可以访问单元值而不必访问磁盘。
如果缓存将所需数据集保留在较低级别的聚合中,则它可以通过卷起来计算所需的数据集。

缓存可以说是聚合策略中最重要的部分,因为它是自适应的。很难选择一组聚合来预先计算在不使用大量磁盘的情况下加速系统的速度,
特别是那些维度较高或用户提交不可预知查询的系统。在数据实时变化的系统中,维护预先计算的聚合是不切实际的。
合理大小的缓存可以允许系统在面对不可预知的查询时充分执行,而预先计算的聚合很少或没有。

蒙德里安的汇总策略如下:

  • 事实数据存储在RDBMS中。RDBMS已经有一个存储管理器,为什么还要开发一个?
  • 通过查询提交分组,将聚合数据读入缓存。同样,RDBMS有一个聚合器,为什么还要开发一个?
  • 如果RDBMS支持实体化视图,并且数据库管理员选择为特定聚合创建实体化视图,则Mondrian将隐式使用它们。
    理想情况下,蒙德里安的聚合管理者应该意识到存在这些物化视图,并且这些特定的聚合计算起来很便宜。
    它甚至应该向数据库管理员提供调优建议。

总体思路是将数据库的内容委托给数据库。
这给数据库带来了额外的负担,但是一旦将这些功能添加到数据库中,数据库的所有客户端都将从中受益。
多维存储可以减少I / O,并在某些情况下可以加快操作速度,但我认为这不足以保证现阶段的复杂性。

一个奇妙的副作用是因为Mondrian自己不需要存储空间,所以可以通过将JAR文件添加到类路径中并立即启动并运行来安装它。
由于没有冗余数据集进行管理,数据加载过程更容易,Mondrian非常适合在实时更改的数据集上执行OLAP。

API

Mondrian为客户端应用程序提供执行查询的API。

由于没有普遍接受的用于执行OLAP查询的API,Mondrian的主要API是专有的; 然而,任何使用过JDBC的人都会发现它很熟悉。
主要区别在于查询语言:Mondrian使用称为MDX的语言(M ulti- D dimension e X pressions)来指定查询,其中JDBC将使用SQL。
下面更详细地描述MDX。

连接 经由创建 的DriverManager,以类似的方式来JDBC。
一个 查询是类似于JDBC 声明,并且通过解析MDX字符串创建。
甲 结果是类似于JDBC 结果集 ; 因为我们正在处理多维数据,所以它由轴和单元组成,而不是行和列。
由于OLAP旨在用于数据挖掘,因此可以通过 drillDown和 sort等操作修改查询中包含的分析树 ,然后重新执行查询。

1
2
3
4
5
6
7
8
9
10
11
12
13
14
15
16
import mondrian.olap.*;
import java.io.PrintWriter;

Connection connection = DriverManager.getConnection(
"Provider=mondrian;" +
"Jdbc=jdbc:odbc:MondrianFoodMart;" +
"Catalog=/WEB-INF/FoodMart.xml;",
null,
false);
Query query = connection.parseQuery(
"SELECT {[Measures].[Unit Sales], [Measures].[Store Sales]} on columns," +
"{[Product].children} on rows " +
"FROM [Sales] " +
"WHERE ([Time].[1997].[Q1], [Store].[CA].[San Francisco])");
Result result = connection.execute(query);
result.print(new PrintWriter(System.out));

API还将数据库模式呈现为一组对象: 模式, 多维数据集, 维度, 层次结构, 级别, 成员。
有关Mondrian API的更多信息,请参阅 javadoc。

用于分析的XML是通过SOAP(简单对象访问协议)访问OLAP服务器的标准。
这允许Microsoft Excel等非Java组件针对Mondrian运行查询。

蒙德里安包括对 JSR-069(‘JOLAP’)提议标准的支持,
但是在明确标准永远不会被批准的情况下,这一支持在mondrian-2.3中被删除。

https://mondrian.pentaho.com/documentation/architecture.php#Figure_1:_Mondrian_architecture

python encode

Posted on 2018-05-22 | Edited on 2020-09-17 | In python

Declare

1
# -*- coding:utf-8 -*-

make clare that the origin code context use utf-8 encoding.

if not declate when unioncode sign appare in origin text, python throw exception:

1
2
SyntaxError: Non-ASCII character '\xe4' in file code_test.py on line 6,
but no encoding declared; see http://python.org/dev/peps/pep-0263/ for details

Setting default encoding

1
2
3
import sys
reload(sys)
sys.setdefaultencoding('utf8')

told python use utf8 as the default encoding to deal symbols
python’s type str use ascii as the default encoding ps. v2.7

1
2
UnicodeEncodeError: 'ascii' codec can't encode character u'\u4e07' in position 0:
ordinal not in range(128)

Exception in db

1
UnicodeEncodeError:'latin-1' codec can't encode character ...

declare the connection and the cursor’s encoding:

1
2
3
4
5
db = pymysql.connect("localhost", "use", "passwd", "db_name" , use_unicode=True,  charset="utf8")
db = MySQLdb.connect(host="localhost", user = "root", passwd = "", db = "testdb", use_unicode=True, charset="utf8")
cursor.execute('SET NAMES utf8;')
cursor.execute('SET CHARACTER SET utf8;')
cursor.execute('SET character_set_connection=utf8;')

Exception in wb

If the web is encoded in gbk or gb2312, use utf8 to show will case messy encoding

1
html = unicode(html, "gbk").encode("utf8")

turn the bytes stream to unicode first in gbk decoding, then encoding in utf8

Encoding transform

  1. if in origin code str delcare has the prfix u then it is unicde encoding
  2. if origin code str has no prefix u then it use it’s text encoding
  3. use unicode(str, codec) to transform str to unicode
  4. most times use str.decode(codec) to decode to bytes stream
1
2
3
4
5
6
7
8
9
10
11
12
13
14
15
16
17
# -*- coding:utf-8 -*-
import sys
reload(sys)
sys.setdefaultencoding('utf8')

# u'\u4e07'
a = u"万"
print a
print ord(a)
print unichr(ord(a))

print "----------------"

b = a.encode('utf8')
print b
c = a.encode('gbk')
print c

in windows bash termianl’s encode is utf8 , gbk is messy encoding
bash
in windows dos terminal’s encode is gbk , utf8 is messy encoding
dos

Encoding in json

1
2
json.dumps # turn json object -> string
json.loads # turn json string -> object
1
2
3
4
# add encoding parameter
json.loads(jStr, encoding="GB2312");
# restrict the string in unicode encoding
json.dumps(js, ensure_ascii=False)

https://stackoverflow.com/questions/3942888/unicodeencodeerror-latin-1-codec-cant-encode-character

https://blog.csdn.net/learn_tech/article/details/52982679

https://blog.csdn.net/xfyangle/article/details/60969522

https://blog.csdn.net/ran337287/article/details/56298949

https://blog.csdn.net/chenzy945/article/details/18267905

Servlet request

Posted on 2018-05-20 | Edited on 2018-12-16 | In java

2017-09-05 17:05:47

Fetch URL

request.getRequestURL()

Parameter List

  • Request in GET

    1
    2
    3
    http://localhost:8070/serverLab/hello?a=1&b=2
    request.getQueryString()
    result: a=1&b=2
  • Request in POST or GET

  1. getParameter()
    This method limited in form’s encoding
    only used in application/x- www-form-urlencoded
    Advantage is very simple, disadvantage is not suit in big data.
    When transfer big data block browser use multipart/form-data

  2. getInputStream() getReader()
    Get context by stream, got bytes or characters

Stream way have conflict with parameter way
When getParameter() read a from encoded by application/x- www-form-urlencoded once
getInputStream() can’t read data any more.vice versa.

When getParameter() read a from encoded by multipart/form-data, can’t read data
So multipart/form-data encoding have no conflict.

PS. request.getInputStream() request.getReader() can’t use in mix or throw exception

About request.getAttribute()

  1. Attribute is survive in container
  2. HttpServletRequest only have setAttribute() on setParameter()
  3. Survive in one request, like forward
  4. session.setAttribute() have Affect in a progress
  5. If from’s data come’s from JS, use a hidden div parse data -_-!!!

aws ec2 mysql

Posted on 2018-05-18 | Edited on 2018-12-16 | In db

Install

1
2
3
4
5
yum install mysql mysql-server mysql-libs

# change owner & group
sudo chgrp -R mysql /var/lib/mysql
chmod -R 770 /var/lib/mysql

Settings

1
2
3
4
5
6
7
8
9
10
11
12
13
SHOW VARIABLES LIKE 'character_set_%';
+--------------------------+----------------------------+
| Variable_name | Value |
+--------------------------+----------------------------+
| character_set_client | utf8 |
| character_set_connection | utf8 |
| character_set_database | latin1 |
| character_set_filesystem | binary |
| character_set_results | utf8 |
| character_set_server | latin1 |
| character_set_system | utf8 |
| character_sets_dir | /usr/share/mysql/charsets/ |
+--------------------------+----------------------------+
1
2
3
4
5
6
7
8
9
10
11
12
13
14
15
set character_set_server=utf8;
set character_set_database=utf8;
SHOW VARIABLES LIKE 'character_set_%';
+--------------------------+----------------------------+
| Variable_name | Value |
+--------------------------+----------------------------+
| character_set_client | utf8 |
| character_set_connection | utf8 |
| character_set_database | utf8 |
| character_set_filesystem | binary |
| character_set_results | utf8 |
| character_set_server | utf8 |
| character_set_system | utf8 |
| character_sets_dir | /usr/share/mysql/charsets/ |
+--------------------------+----------------------------+

Passwd

  1. mysqladmin

    1
    mysqladmin -u root password 'psswd'
  2. update

    1
    2
    3
    4
    mysql -u root
     mysql> use mysql;
     mysql> UPDATE user SET Password = PASSWORD('passwd') WHERE user = 'root';
     mysql> FLUSH PRIVILEGES;
  3. set

    1
    2
    MySQL -u root
      mysql> SET PASSWORD FOR 'root'@'localhost' = PASSWORD('passwd');
  4. skip

    1
    2
    3
    4
    5
    vim /etc/my.cnf
    # remove after the job
    add `skip-grant-tables`
    wq
    service mysqld restart
1
2
service mysqld stop
mysqld_safe --skip-grant-tables&

User & Db

1
2
3
4
5
create user 'test'@'localhost' identified by '123456';
create database testdb default charset utf8 collate utf8_general_ci;
grant all privileges on `testdb`.* to 'test'@'localhost' identified by '123456';
flush privileges;
mysql -u test -h 1.1.1.1 -p

Exception

ERROR 1227 (42000): Access denied; you need (at least one of) …
If sign in mysql in localhost like this:

1
mysql -u root -p

no privileges on create user/ create db/ show process …

1
2
3
4
5
6
show grants for ''@'localhost';
+----------------------------------------------------------------------+
| Grants for @localhost |
+----------------------------------------------------------------------+
| GRANT USAGE ON *.* TO ''@'localhost' IDENTIFIED BY PASSWORD <secret> |
+----------------------------------------------------------------------+

the command should be like this:

1
mysql -u root -h 127.0.0.1 -p

Amazon EC2
AWS Linux MySQL Install
ERROR 1227 (42000)
ERROR 1045 (28000)

Java exec

Posted on 2018-04-20 | Edited on 2018-12-16 | In java

Init

  1. Runtime.getRuntime() is the only method can get jvm runing environment
  2. Most method in Runtime is implements method
  3. Runtime.exit() is the only method exit current jvm. System.exit()
  4. 0 represent normal execute, !0 represent exception
  5. Runtime.addShutdownHook() can recieve a thread object as a handle
  6. public Process exec(String[] cmdarray, String[] envp, File dir)
    when sub process use current process environment variable, envp is null.

Call

1
2
Process proc = Runtime.getRuntime().exec("java");
int exitVal = proc.exitValue();

Process call exitValue is not block, if needed add a loop call

1
2
3
Process proc = Runtime.getRuntime().exec("java");
// add stream setting
int exitVal = proc.waitFor();

correct call process need set process’s stream setting, make sure thread will not block.

1
2
3
Process proc = Runtime.getRuntime().exec("java hello > hi");
// add stream setting
int exitVal = proc.waitFor();

in command line can’t execute bash sign like > >> < &.

1
2
3
4
Process proc = Runtime.getRuntime().exec(
new String[]{"/bin/bash", "-c", "java hello > hi"}, null, null);
// add stream setting
int exitVal = proc.waitFor();

if need these local operation, you can write these in a shell script, or load bash in java.

Call in windows

if you want call in windows you need install bash first

1
2
3
4
Process proc = Runtime.getRuntime().exec(
new String[]{"D:\\Program Files\\Git\\bin\\sh.exe", "-c", command}, null, null);
// add stream setting
int exitVal = proc.waitFor();

if jvm execute path is not the exec path, you need add specific path

1
2
3
4
Process proc = Runtime.getRuntime().exec(
new String[]{"D:\\Program Files\\Git\\bin\\sh.exe", "-c", command}, null, new File(workPath));
// add stream setting
int exitVal = proc.waitFor();

ps. -c mean read parameter in string format, not directly %0 %1

Another way

If you want jvm do standard in /out, use another thread read or write data

1
2
3
4
5
Process proc = Runtime.getRuntime().exec("java hello");
// add pip stream thread setting
StreamThread director = new StreamThread(proc.getInputStream(),proc.getOutputStream());
director.start();
int exitVal = proc.waitFor();

https://blog.csdn.net/mengxingyuanlove/article/details/50707746
https://blog.csdn.net/timo1160139211/article/details/75006938

Gif camera

Posted on 2018-04-05 | Edited on 2018-12-16 | In raspberry

1
2
3
4
5
6
7
8
9
10
11
12
sudo apt-get update
# Optional
sudo apt-get upgrade

# Used to control camera
sudo apt-get install python-picamera python3-picamera
# Used to convert jpg to gif
sudo apt-get install graphicsmagick

sudo apt-get install git-core
# This script is used in 'PIX-E Gif Camera' project
sudo git clone https://github.com/nickbrewer/gifcam.git

If we just want raspberry pi camera can take gif picture, we can just remove `GPIO` and `Twitter` module, no need led notification/ real time upload ro so.

1
2
3
4
5
6
7
8
# import module first
import picamera
from time import sleep
import time
import datetime
from os import system
import os
import random, string
1
2
3
4
# set options
um_frame = 8 # Number of frames in Gif
gif_delay = 15 # Frame delay [ms]
rebound = True # Create a video that loops start <=> end
1
2
3
4
5
6
# set camera parameters
camera = picamera.PiCamera()
camera.resolution = (540, 405)
camera.rotation = 90
#camera.brightness = 70
camera.image_effect = 'none'

Take jpg pictures

1
2
3
4
5
6
7
8
9
10
print('Gif Started')

### PREVENT DARK INIT IMAGE ###
camera.led = False
camera.start_preview()
sleep(1)
camera.led = True

for i in range(num_frame):
camera.capture('{0:04d}.jpg'.format(i))

If rebound is True then make picture loop

1
2
3
4
5
6
7
8
9
### PROCESSING GIF ###
if rebound == True: # make copy of images in reverse order
for i in range(num_frame - 1):
source = str(num_frame - i - 1) + ".jpg"
source = source.zfill(8) # pad with zeros
dest = str(num_frame + i) + ".jpg"
dest = dest.zfill(8) # pad with zeros
copyCommand = "cp " + source + " " + dest
os.system(copyCommand)

Convert picture to gif and cleanup

1
2
3
4
5
6
7
8
9
10
11
# Correction of time difference
now = datetime.datetime.now() + datetime.timedelta(hours=8)
filename = '/home/pi/gifcam/gifs' + now.strftime('%Y%m%d%H%M%S')
print('Processing')
# Convert command
graphicsmagick = "gm convert -delay " + str(gif_delay) + " " + "*.jpg " + filename + ".gif"
os.system(graphicsmagick)
os.system("rm ./*.jpg") # cleanup source images

print('Done')
print('System Ready')

http://shumeipai.nxez.com/2016/11/06/build-a-disposable-gif-camera.html
https://hackaday.io/project/16358-pix-e-gif-camera

Manacher's algorithm

Posted on 2018-03-21 | Edited on 2020-09-17 | In algorithm

O(n) time complexity find longest palindromic substring

Translate

put origin string into a new char array, take “ABBABCBA”
make odd/ even length origin string into a odd length array (#,…,#)

1
char S[] = {'^', '#', 'A', '#', 'B', '#', 'B', '#', 'A', '#', 'B', '#', 'C', '#', 'B', '#', 'A', '#', '\0'};

1
char S[] = {'^', '#', 'A', '#', 'B', '#', 'B', '#', 'A', '#', 'B', '#', 'C', '#', 'B', '#', 'A', '#', '$'};

put position 0 and last postion a placeholder, S.length = origin * 2 + 3 odd length.

Mark

declare a array P[] to mark the S’s char symmetric radius length

1
2
char S[] = {'^', '#', 'A', '#', 'B', '#', 'B', '#', 'A', '#', 'B', '#', 'C', '#', 'B', '#', 'A', '#', '$'};
int P[] = { 0 , 1 , 2 , 1 , 2 , 5 , 2 , 1 , 4 , 1 , 2 , 1 , 6 , 1 , 2 , 1 , 2 , 1 , 0 };

describe:

array P used to describe radius, for example :

P[5] = 5 -> S(1,5) | S(5, 9)

calculate:

Declare varable

  1. center the center of mirror
  2. right the right terminal of mirror

right = center + P[center] , right point = center point + radius

left = center - P[center] , left point = center point - radius

declare i as current S cursor

delcare mirror as the i’s mirror index ps. 2*center - right

when right > i, then P[i] >= Min(P[mirror], right - i)

  1. when P[mirror] is minimum, that meaning P[mirror] < right - i

    standard check block: (mirror - P[mirror], mirror + P[mirror]) | (i-P[mirror], i + P[mirror])
  2. when right - i is minimum, that meaning P[mirror] > right - i

    mirror - P[mirror] across the circle left border.

    standard check block: (mirror - (right - i), mirrror + (right - i)) | (i - (right - i), right)

Code & Graph

1
2
3
4
5
6
7
8
9
10
11
12
13
14
15
16
17
// right = center + P[center]
int center = 0, right = 0;
// exclude last placeholder position
for (int i=1; i<S.length-1; i++) {
// j = 2*center - i
P[i] = right > i? Math.min(P[2*center - i], right - i): 1;

// include char itself, 1 bigger than standard implements
while(S[i + P[i]] == S[i - P[i]]) P[i]++;

// judge whether new radiu cross border
if(i + P[i] > right) {
right = i + P[i];
center = i;
}

}

Biggest value in P[] is longest palindromic substring lengh
It’s index is substring’s char center index.

1
2
3
4
5
// find biggest value in P[]
length--;
// and it's index
center--;
src.substring((center - length) / 2, (center + length) / 2)

thanks:
https://www.felix021.com/blog/read.php?2040

1…131415…29

Leon

282 posts
20 categories
58 tags
GitHub
Links
  • clock
  • typing-cn
  • mathjax
  • katex
  • cron
  • dos
  • keyboard
  • regex
  • sql
  • toy
© 2017 – 2024 Leon
Powered by Hexo v3.9.0
|
Theme – NexT.Muse v7.1.2